Introduction
If you are a car enthusiast or a proud owner of a vehicle, you understand the significance of maintaining its appearance. Paint correction is a crucial process that can revitalize and restore the glossy finish of your car’s paintwork. In this ultimate guide, we will explore the world of paint correction, providing you with everything you need to know to achieve stunning results and preserve the beauty of your vehicle.
What is Paint Correction?
Paint correction is a meticulous process that involves removing imperfections from a vehicle’s paintwork, such as swirl marks, scratches, oxidation, and water spots. Over time, these flaws can accumulate and diminish the overall appearance of your car. By employing specialized techniques and products, paint correction aims to restore the original glossy finish, enhance the depth and clarity of the paint, and eliminate surface defects.
Understanding the Three Stages of Paint Correction
Stage 1: Compounding
Compounding is the initial stage of paint correction and involves the use of an abrasive compound. This step aims to eliminate deeper scratches, oxidation, and other severe defects. The compound is applied using a machine polisher, which helps break down the abrasive particles and restore the smoothness of the paint surface.
Stage 2: Polishing
Polishing follows compounding and focuses on refining the paintwork further. A less abrasive polish is used to remove any remaining swirl marks, hazing, or minor imperfections. This step helps restore clarity, depth, and gloss to the paint, preparing it for the final stage.
Stage 3: Finishing
The finishing stage involves using a fine polish or a glaze to refine the paintwork even more and achieve a flawless, mirror-like finish. This step enhances the gloss, depth, and overall visual appeal of the paint, providing an impressive showroom finish.
Tools and Products Required for Paint Correction
To perform paint correction effectively, you will need a range of tools and products specifically designed for this purpose. Here are some essentials:
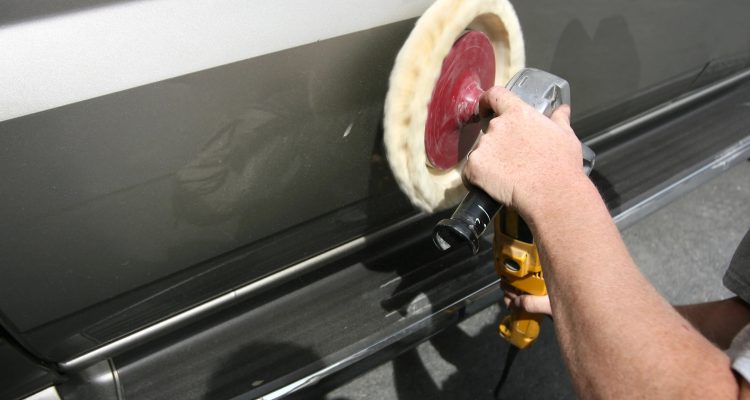
Buffing Machine
A dual-action or rotary polisher is essential for paint correction. These machines provide the necessary power and control to apply compounds and polishes effectively. Make sure to choose a reliable and reputable brand to ensure optimal performance.
Compounds and Polishes
High-quality compounds and polishes are vital for achieving excellent paint correction results. Compounds contain abrasive particles that remove defects, while polishes refine the paint surface. Select products suitable for your car’s paint type and the level of correction needed.
Microfiber Towels
Microfiber towels are ideal for wiping off compounds, polishes, and residue during the correction process. These towels are soft, lint-free, and highly absorbent, ensuring gentle and efficient cleaning without leaving scratches or swirl marks.
Clay Bar
Before starting the paint correction, it’s crucial to decontaminate the paint surface. A clay bar helps remove embedded contaminants like dirt, industrial fallout, or tree sap. This step prepares the paint for correction and ensures a smoother and more even finish.
Preparing Your Vehicle for Paint Correction
To achieve the best results during paint correction, proper preparation is key. Follow these essential steps to prepare your vehicle:
Washing and Drying
Thoroughly wash your car using a pH-balanced car shampoo and a soft wash mitt or sponge. Rinse off any loose dirt and grime, ensuring a clean surface. After washing, dry the vehicle using a microfiber drying towel or a blower to prevent water spots.
Decontamination
To remove surface contaminants that washing may not eliminate, use a clay bar. Lubricate the paint surface with a clay lubricant or a detailing spray and gently glide the clay bar over the paint. This process will pick up any embedded particles, leaving the surface smooth and ready for correction.
Masking
To protect sensitive areas like rubber trim, plastic, or emblems, use masking tape. Cover these areas to prevent accidental damage or staining during the correction process. This step ensures precision and protects your vehicle’s vulnerable parts.
Performing Paint Correction
Now that your vehicle is prepared, it’s time to begin the paint correction process. Follow these steps for successful paint correction:
Working on a Small Section at a Time
Divide your vehicle into manageable sections and focus on one area at a time. This approach allows you to give proper attention to each section and ensures consistent results. Typically, a 2×2-foot area is a good starting point.
Using the Correct Technique
When using the buffing machine, hold it firmly but not too tightly. Apply moderate pressure and move the machine in a slow, overlapping motion. Remember to work in straight lines and avoid excessive heat buildup by periodically checking the surface temperature.
Evaluating Your Progress
Regularly assess your progress to determine when to move on to the next stage or section. Use proper lighting conditions to inspect the paint for defects. Take your time and make sure each stage is completed thoroughly before moving forward.
Post-Correction Care and Protection
After completing the paint correction process, it’s essential to take care of your newly restored paintwork. Here are some post-correction care tips:
Applying a Quality Sealant or Wax
To protect the freshly corrected paint, apply a high-quality sealant or wax. These products provide a protective barrier against environmental contaminants and UV rays, helping to maintain the paint’s gloss and preventing premature deterioration.
Regular Maintenance
Regularly wash your car using a gentle car shampoo and soft mitt or sponge. Avoid using harsh chemicals or abrasive tools that could damage the paint. Additionally, perform periodic inspections to identify any new imperfections or issues that may require attention.
Common Mistakes to Avoid
To ensure successful paint correction, it’s essential to avoid common mistakes that can compromise your results. Here are some pitfalls to watch out for:
Using the Wrong Products
Using the wrong compounds, polishes, or tools can lead to subpar results or even damage to your vehicle’s paint. Always select products that are suitable for your specific paint type and follow the manufacturer’s instructions.
Applying Excessive Pressure
Applying excessive pressure with the buffing machine can cause heat buildup and result in paint damage. Remember to maintain a moderate pressure and let the machine and products do the work for you. Too much pressure can also lead to uneven correction and swirl marks.
Skipping Essential Steps
Each stage of paint correction is crucial and serves a specific purpose. Skipping stages or rushing through the process can lead to incomplete correction or unsatisfactory results. Take your time and ensure that each stage is properly executed before moving on.
Benefits of Professional Paint Correction
While DIY paint correction can be rewarding, there are distinct advantages to seeking professional help. Here are some benefits of professional paint correction:
Experience and Expertise
Professional detailers have extensive experience and expertise in paint correction techniques. They have refined their skills through years of practice and can achieve exceptional results with precision and efficiency.
Advanced Tools and Techniques
Professional detailers have access to advanced tools and equipment that may not be readily available to the average car owner. These tools, combined with their knowledge, allow them to tackle complex paint imperfections effectively.
Time and Effort Savings
Paint correction can be a time-consuming and labor-intensive process, especially for beginners. By opting for professional services, you can save time and effort while enjoying the peace of mind that comes with knowing the job will be done to a high standard.
Conclusion
Paint correction is a transformative process that can breathe new life into your vehicle’s appearance. By understanding the stages, preparing properly, and using the right techniques, you can achieve remarkable results. Whether you choose to embark on a DIY project or seek professional assistance, the ultimate goal is to restore and maintain the beauty of your car’s paintwork.
Remember to prioritize regular maintenance and protection to prolong the effects of paint correction. With proper care, your vehicle will continue to turn heads and shine on the road. Learn more about the side effects of paint correction.